Control flow
Workflows run a sequence of predefined tasks, and you can control how that flow is executed. Tasks are divided into steps, which can be executed in different ways depending on your requirements. They can run sequentially, in parallel, or follow different paths based on conditions.
Each step connects to the next in the workflow through defined schemas that keep data controlled and consistent.
Core principlesDirect link to Core principles
- The first step’s
inputSchemamust match the workflow’sinputSchema. - The final step’s
outputSchemamust match the workflow’soutputSchema. - Each step’s
outputSchemamust match the next step’sinputSchema.- If it doesn’t, use Input data mapping to transform the data into the required shape.
Chaining steps with .then()Direct link to chaining-steps-with-then
Use .then() to run steps in order, allowing each step to access the result of the step before it.

const step1 = createStep({
  inputSchema: z.object({
    message: z.string(),
  }),
  outputSchema: z.object({
    formatted: z.string(),
  }),
})

const step2 = createStep({
  inputSchema: z.object({
    formatted: z.string(),
  }),
  outputSchema: z.object({
    emphasized: z.string(),
  }),
})

export const testWorkflow = createWorkflow({
  inputSchema: z.object({
    message: z.string(),
  }),
  outputSchema: z.object({
    emphasized: z.string(),
  }),
})
  .then(step1)
  .then(step2)
  .commit()
Simultaneous steps with .parallel()Direct link to simultaneous-steps-with-parallel
Use .parallel() to run steps at the same time. All parallel steps must complete before the workflow continues to the next step. Each step's id is used when defining a following step's inputSchema and becomes the key on the inputData object used to access the previous step's values. The outputs of parallel steps can then be referenced or combined by a following step.

const step1 = createStep({
  id: 'step-1',
})

const step2 = createStep({
  id: 'step-2',
})

const step3 = createStep({
  id: 'step-3',
  inputSchema: z.object({
    'step-1': z.object({
      formatted: z.string(),
    }),
    'step-2': z.object({
      emphasized: z.string(),
    }),
  }),
  outputSchema: z.object({
    combined: z.string(),
  }),
  execute: async ({ inputData }) => {
    const { formatted } = inputData['step-1']
    const { emphasized } = inputData['step-2']
    return {
      combined: `${formatted} | ${emphasized}`,
    }
  },
})

export const testWorkflow = createWorkflow({
  inputSchema: z.object({
    message: z.string(),
  }),
  outputSchema: z.object({
    combined: z.string(),
  }),
})
  .parallel([step1, step2])
  .then(step3)
  .commit()
Output structureDirect link to Output structure
When steps run in parallel, the output is an object where each key is the step's id and the value is that step's output. This allows you to access each parallel step's result independently.
const step1 = createStep({
  id: 'format-step',
  inputSchema: z.object({ message: z.string() }),
  outputSchema: z.object({ formatted: z.string() }),
  execute: async ({ inputData }) => ({
    formatted: inputData.message.toUpperCase(),
  }),
})

const step2 = createStep({
  id: 'count-step',
  inputSchema: z.object({ message: z.string() }),
  outputSchema: z.object({ count: z.number() }),
  execute: async ({ inputData }) => ({
    count: inputData.message.length,
  }),
})

const step3 = createStep({
  id: 'combine-step',
  // The inputSchema must match the structure of parallel outputs
  inputSchema: z.object({
    'format-step': z.object({ formatted: z.string() }),
    'count-step': z.object({ count: z.number() }),
  }),
  outputSchema: z.object({ result: z.string() }),
  execute: async ({ inputData }) => {
    // Access each parallel step's output by its id
    const formatted = inputData['format-step'].formatted
    const count = inputData['count-step'].count
    return {
      result: `${formatted} (${count} characters)`,
    }
  },
})

export const testWorkflow = createWorkflow({
  id: 'parallel-output-example',
  inputSchema: z.object({ message: z.string() }),
  outputSchema: z.object({ result: z.string() }),
})
  .parallel([step1, step2])
  .then(step3)
  .commit()

// When executed with { message: "hello" }
// The parallel output structure will be:
// {
//   "format-step": { formatted: "HELLO" },
//   "count-step": { count: 5 }
// }
Key points:
- Each parallel step's output is keyed by its
id - All parallel steps execute simultaneously
- The next step receives an object containing all parallel step outputs
- You must define the
inputSchemaof the following step to match this structure
Handling step failuresDirect link to Handling step failures
If any parallel step throws an error, the entire parallel block fails. To build resilient parallel workflows where some steps may fail — for example, multiple research agents where one might have an expired auth token — handle errors inside the step itself using try/catch:
const resilientStep = createStep({
  id: 'researcher',
  inputSchema: z.object({ query: z.string() }),
  outputSchema: z.object({
    brief: z.string().nullable(),
    failed: z.boolean(),
  }),
  execute: async ({ inputData }) => {
    try {
      const result = await fetchExternalData(inputData.query)
      return { brief: result, failed: false }
    } catch {
      return { brief: null, failed: true }
    }
  },
})
This way the step always succeeds with a typed result, and the downstream step can filter out failed results:
const writerStep = createStep({
  id: 'writer',
  inputSchema: z.object({
    'researcher-a': z.object({ brief: z.string().nullable(), failed: z.boolean() }),
    'researcher-b': z.object({ brief: z.string().nullable(), failed: z.boolean() }),
  }),
  outputSchema: z.object({ synthesis: z.string() }),
  execute: async ({ inputData }) => {
    const briefs = Object.values(inputData)
      .filter(v => !v.failed && v.brief)
      .map(v => v.brief)
    return { synthesis: briefs.join('; ') }
  },
})
Visit Choosing the right pattern to understand when to use .parallel() vs .foreach().
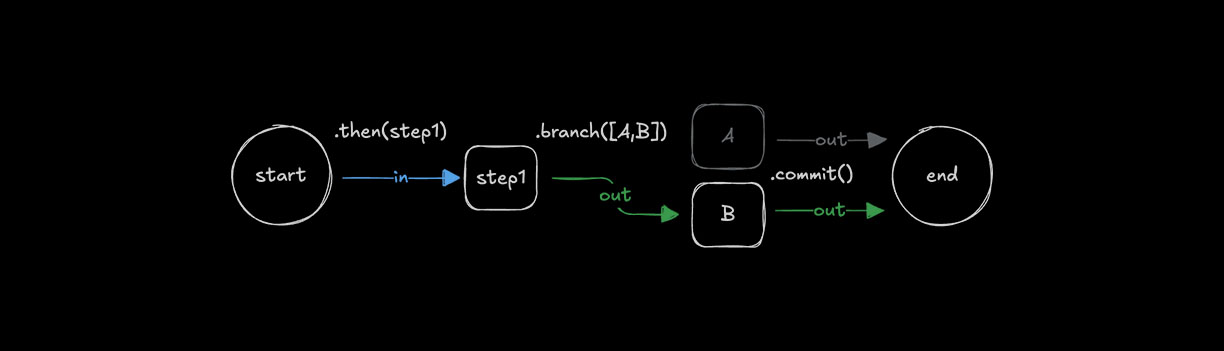
Conditional logic with .branch()Direct link to conditional-logic-with-branch
Use .branch() to choose which step to run based on a condition. All steps in a branch need the same inputSchema and outputSchema because branching requires consistent schemas so workflows can follow different paths.
const step1 = createStep({...})

const stepA = createStep({
  inputSchema: z.object({
    value: z.number()
  }),
  outputSchema: z.object({
    result: z.string()
  })
});

const stepB = createStep({
  inputSchema: z.object({
    value: z.number()
  }),
  outputSchema: z.object({
    result: z.string()
  })
});

export const testWorkflow = createWorkflow({
  inputSchema: z.object({
    value: z.number()
  }),
  outputSchema: z.object({
    result: z.string()
  })
})
  .then(step1)
  .branch([
    [async ({ inputData: { value } }) => value > 10, stepA],
    [async ({ inputData: { value } }) => value <= 10, stepB]
  ])
  .commit();
Output structureDirect link to Output structure
When using conditional branching, only one branch executes based on which condition evaluates to true first. The output structure is similar to .parallel(), where the result is keyed by the executed step's id.
const step1 = createStep({
  id: 'initial-step',
  inputSchema: z.object({ value: z.number() }),
  outputSchema: z.object({ value: z.number() }),
  execute: async ({ inputData }) => inputData,
})

const highValueStep = createStep({
  id: 'high-value-step',
  inputSchema: z.object({ value: z.number() }),
  outputSchema: z.object({ result: z.string() }),
  execute: async ({ inputData }) => ({
    result: `High value: ${inputData.value}`,
  }),
})

const lowValueStep = createStep({
  id: 'low-value-step',
  inputSchema: z.object({ value: z.number() }),
  outputSchema: z.object({ result: z.string() }),
  execute: async ({ inputData }) => ({
    result: `Low value: ${inputData.value}`,
  }),
})

const finalStep = createStep({
  id: 'final-step',
  // The inputSchema must account for either branch's output
  inputSchema: z.object({
    'high-value-step': z.object({ result: z.string() }).optional(),
    'low-value-step': z.object({ result: z.string() }).optional(),
  }),
  outputSchema: z.object({ message: z.string() }),
  execute: async ({ inputData }) => {
    // Only one branch will have executed
    const result = inputData['high-value-step']?.result || inputData['low-value-step']?.result
    return { message: result }
  },
})

export const testWorkflow = createWorkflow({
  id: 'branch-output-example',
  inputSchema: z.object({ value: z.number() }),
  outputSchema: z.object({ message: z.string() }),
})
  .then(step1)
  .branch([
    [async ({ inputData }) => inputData.value > 10, highValueStep],
    [async ({ inputData }) => inputData.value <= 10, lowValueStep],
  ])
  .then(finalStep)
  .commit()

// When executed with { value: 15 }
// Only the high-value-step executes, output structure:
// {
//   "high-value-step": { result: "High value: 15" }
// }

// When executed with { value: 5 }
// Only the low-value-step executes, output structure:
// {
//   "low-value-step": { result: "Low value: 5" }
// }
Key points:
- Only one branch executes based on condition evaluation order
- The output is keyed by the executed step's
id - Subsequent steps should handle all possible branch outputs
- Use optional fields in the
inputSchemawhen the next step needs to handle multiple possible branches - Conditions are evaluated in the order they're defined
Input data mappingDirect link to Input data mapping
When using .then(), .parallel(), or .branch(), it's sometimes necessary to transform the output of a previous step to match the input of the next. In these cases you can use .map() to access the inputData and transform it to create a suitable data shape for the next step.

const step1 = createStep({...});
const step2 = createStep({...});

export const testWorkflow = createWorkflow({...})
  .then(step1)
  .map(async ({ inputData }) => {
    const { foo } = inputData;
    return {
      bar: `new ${foo}`,
    };
  })
  .then(step2)
  .commit();
The .map() method provides additional helper functions for more complex mapping scenarios.
Available helper functions:
getStepResult(): Access a specific step's full outputgetInitData<any>(): Access the workflow's initial input datamapVariable(): Use declarative object syntax to extract and rename fields
Parallel and Branch outputsDirect link to Parallel and Branch outputs
When working with .parallel() or .branch() outputs, you can use .map() to transform the data structure before passing it to the next step. This is especially useful when you need to flatten or restructure the output.
export const testWorkflow = createWorkflow({...})
  .parallel([step1, step2])
  .map(async ({ inputData }) => {
    // Transform the parallel output structure
    return {
      combined: `${inputData["step1"].value} - ${inputData["step2"].value}`
    };
  })
  .then(nextStep)
  .commit();
You can also use the helper functions provided by .map():
export const testWorkflow = createWorkflow({...})
  .branch([
    [condition1, stepA],
    [condition2, stepB]
  ])
  .map(async ({ inputData, getStepResult }) => {
    // Access specific step results
    const stepAResult = getStepResult("stepA");
    const stepBResult = getStepResult("stepB");

    // Return the result from whichever branch executed
    return stepAResult || stepBResult;
  })
  .then(nextStep)
  .commit();
Looping stepsDirect link to Looping steps
Workflows support different looping methods that let you repeat steps until or while a condition is met, or iterate over arrays. Loops can be combined with other control methods like .then().
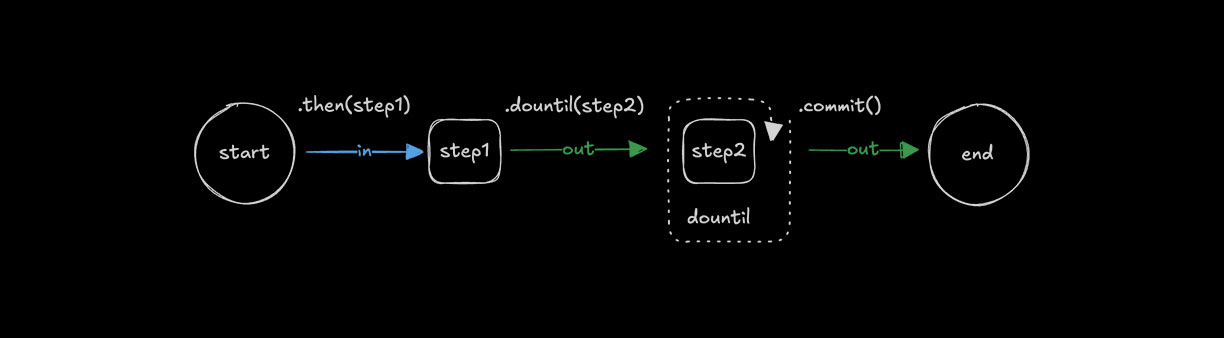
Looping with .dountil()Direct link to looping-with-dountil
Use .dountil() to run a step repeatedly until a condition becomes true.
const step1 = createStep({...});

const step2 = createStep({
  execute: async ({ inputData }) => {
    const { number } = inputData;
    return {
      number: number + 1
    };
  }
});

export const testWorkflow = createWorkflow({})
  .then(step1)
  .dountil(step2, async ({ inputData: { number } }) => number > 10)
  .commit();
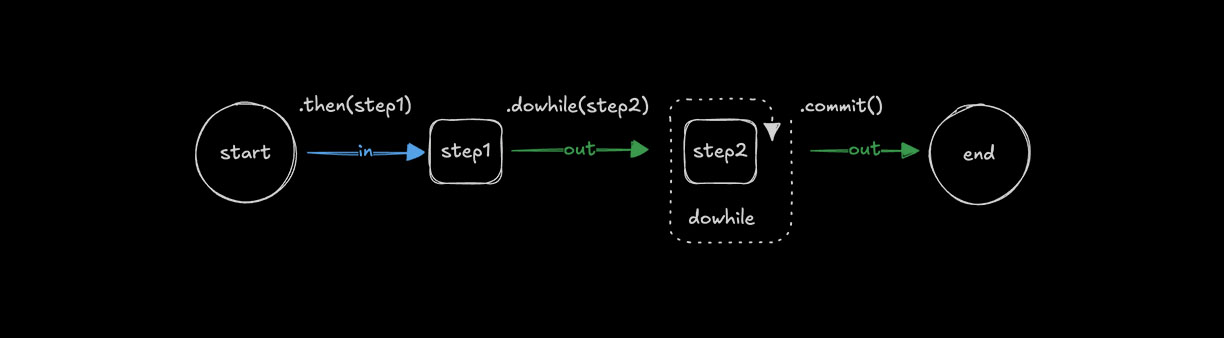
Looping with .dowhile()Direct link to looping-with-dowhile
Use .dowhile() to run a step repeatedly while a condition remains true.
const step1 = createStep({...});

const step2 = createStep({
  execute: async ({ inputData }) => {
    const { number } = inputData;
    return {
      number: number + 1
    };
  }
});

export const testWorkflow = createWorkflow({})
  .then(step1)
  .dowhile(step2, async ({ inputData: { number } }) => number < 10)
  .commit();
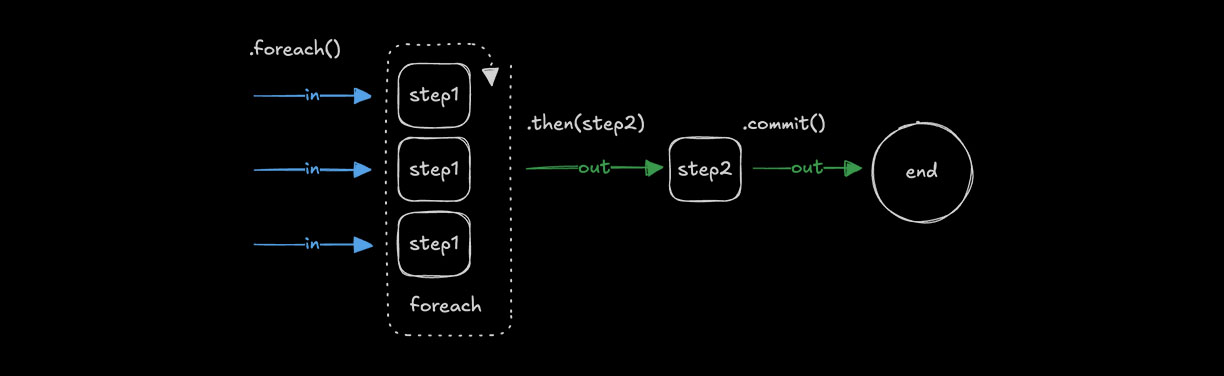
Looping with .foreach()Direct link to looping-with-foreach
Use .foreach() to run the same step for each item in an array. The input must be of type array so the loop can iterate over its values, applying the step's logic to each one. See Choosing the right pattern for guidance on when to use .foreach() vs other methods.
const step1 = createStep({
  inputSchema: z.string(),
  outputSchema: z.string(),
  execute: async ({ inputData }) => {
    return inputData.toUpperCase();
  }
});

const step2 = createStep({...});

export const testWorkflow = createWorkflow({
  inputSchema: z.array(z.string()),
  outputSchema: z.array(z.string())
})
  .foreach(step1)
  .then(step2)
  .commit();
Output structureDirect link to Output structure
The .foreach() method always returns an array containing the output of each iteration. The order of outputs matches the order of inputs.
const addTenStep = createStep({
  id: 'add-ten',
  inputSchema: z.object({ value: z.number() }),
  outputSchema: z.object({ value: z.number() }),
  execute: async ({ inputData }) => ({
    value: inputData.value + 10,
  }),
})

export const testWorkflow = createWorkflow({
  id: 'foreach-output-example',
  inputSchema: z.array(z.object({ value: z.number() })),
  outputSchema: z.array(z.object({ value: z.number() })),
})
  .foreach(addTenStep)
  .commit()

// When executed with [{ value: 1 }, { value: 22 }, { value: 333 }]
// Output: [{ value: 11 }, { value: 32 }, { value: 343 }]
Concurrency limitsDirect link to Concurrency limits
Use concurrency to control the number of array items processed at the same time. The default is 1, which runs steps sequentially. Increasing the value allows .foreach() to process multiple items simultaneously.
const step1 = createStep({...})

export const testWorkflow = createWorkflow({...})
  .foreach(step1, { concurrency: 4 })
  .commit();
Aggregating results after .foreach()Direct link to aggregating-results-after-foreach
Since .foreach() outputs an array, you can use .then() or .map() to aggregate or transform the results. The step following .foreach() receives the entire array as its input.
const processItemStep = createStep({
  id: 'process-item',
  inputSchema: z.object({ value: z.number() }),
  outputSchema: z.object({ processed: z.number() }),
  execute: async ({ inputData }) => ({
    processed: inputData.value * 2,
  }),
})

const aggregateStep = createStep({
  id: 'aggregate',
  // Input is an array of outputs from foreach
  inputSchema: z.array(z.object({ processed: z.number() })),
  outputSchema: z.object({ total: z.number() }),
  execute: async ({ inputData }) => ({
    // Sum all processed values
    total: inputData.reduce((sum, item) => sum + item.processed, 0),
  }),
})

export const testWorkflow = createWorkflow({
  id: 'foreach-aggregate-example',
  inputSchema: z.array(z.object({ value: z.number() })),
  outputSchema: z.object({ total: z.number() }),
})
  .foreach(processItemStep)
  .then(aggregateStep) // Receives the full array from foreach
  .commit()

// When executed with [{ value: 1 }, { value: 2 }, { value: 3 }]
// After foreach: [{ processed: 2 }, { processed: 4 }, { processed: 6 }]
// After aggregate: { total: 12 }
You can also use .map() to transform the array output:
export const testWorkflow = createWorkflow({...})
  .foreach(processItemStep)
  .map(async ({ inputData }) => ({
    // Transform the array into a different structure
    values: inputData.map(item => item.processed),
    count: inputData.length
  }))
  .then(nextStep)
  .commit();
Chaining multiple .foreach() callsDirect link to chaining-multiple-foreach-calls
When you chain .foreach() calls, each operates on the array output of the previous step. This is useful when each item in your array needs to be transformed by multiple steps in sequence.
const chunkStep = createStep({
  id: 'chunk',
  // Takes a document, returns an array of chunks
  inputSchema: z.object({ content: z.string() }),
  outputSchema: z.array(z.object({ chunk: z.string() })),
  execute: async ({ inputData }) => {
    // Split document into chunks
    const chunks = inputData.content.match(/.{1,100}/g) || []
    return chunks.map(chunk => ({ chunk }))
  },
})

const embedStep = createStep({
  id: 'embed',
  // Takes a single chunk, returns embedding
  inputSchema: z.object({ chunk: z.string() }),
  outputSchema: z.object({ embedding: z.array(z.number()) }),
  execute: async ({ inputData }) => ({
    embedding: [
      /* vector embedding */
    ],
  }),
})

// For a single document that produces multiple chunks:
export const singleDocWorkflow = createWorkflow({
  id: 'single-doc-rag',
  inputSchema: z.object({ content: z.string() }),
  outputSchema: z.array(z.object({ embedding: z.array(z.number()) })),
})
  .then(chunkStep) // Returns array of chunks
  .foreach(embedStep) // Process each chunk -> array of embeddings
  .commit()
For processing multiple documents where each produces multiple chunks, you have options:
Option 1: Process all documents in a single step with batching control
const downloadAndChunkStep = createStep({
  id: "download-and-chunk",
  inputSchema: z.array(z.string()),  // Array of URLs
  outputSchema: z.array(z.object({ chunk: z.string(), source: z.string() })),
  execute: async ({ inputData: urls }) => {
    // Control batching/parallelization within the step
    const allChunks = [];
    for (const url of urls) {
      const content = await fetch(url).then(r => r.text());
      const chunks = content.match(/.{1,100}/g) || [];
      allChunks.push(...chunks.map(chunk => ({ chunk, source: url })));
    }
    return allChunks;
  }
});

export const multiDocWorkflow = createWorkflow({...})
  .then(downloadAndChunkStep)  // Returns flat array of all chunks
  .foreach(embedStep, { concurrency: 10 })  // Embed each chunk in parallel
  .commit();
Option 2: Use foreach for documents, aggregate chunks, then foreach for embeddings
const downloadStep = createStep({
  id: 'download',
  inputSchema: z.string(), // Single URL
  outputSchema: z.object({ content: z.string(), source: z.string() }),
  execute: async ({ inputData: url }) => ({
    content: await fetch(url).then(r => r.text()),
    source: url,
  }),
})

const chunkDocStep = createStep({
  id: 'chunk-doc',
  inputSchema: z.object({ content: z.string(), source: z.string() }),
  outputSchema: z.array(z.object({ chunk: z.string(), source: z.string() })),
  execute: async ({ inputData }) => {
    const chunks = inputData.content.match(/.{1,100}/g) || []
    return chunks.map(chunk => ({ chunk, source: inputData.source }))
  },
})

export const multiDocWorkflow = createWorkflow({
  id: 'multi-doc-rag',
  inputSchema: z.array(z.string()), // Array of URLs
  outputSchema: z.array(z.object({ embedding: z.array(z.number()) })),
})
  .foreach(downloadStep, { concurrency: 5 }) // Download docs in parallel
  .foreach(chunkDocStep) // Chunk each doc -> array of chunk arrays
  .map(async ({ inputData }) => {
    // Flatten nested arrays: [[chunks], [chunks]] -> [chunks]
    return inputData.flat()
  })
  .foreach(embedStep, { concurrency: 10 }) // Embed all chunks
  .commit()
Key points about chaining .foreach():
- Each
.foreach()operates on the array from the previous step - If a step inside
.foreach()returns an array, the output becomes an array of arrays - Use
.map()with.flat()to flatten nested arrays when needed - For complex RAG pipelines, Option 1 (handling batching in a single step) often provides better control
Nested workflows inside foreachDirect link to Nested workflows inside foreach
The step after .foreach() only executes after all iterations complete. If you need to run multiple sequential operations per item, use a nested workflow instead of chaining multiple .foreach() calls. This keeps all operations for each item together and makes the data flow clearer.
// Define a workflow that processes a single document
const processDocumentWorkflow = createWorkflow({
  id: 'process-document',
  inputSchema: z.object({ url: z.string() }),
  outputSchema: z.object({
    embeddings: z.array(z.array(z.number())),
    metadata: z.object({ url: z.string(), chunkCount: z.number() }),
  }),
})
  .then(downloadStep) // Download the document
  .then(chunkStep) // Split into chunks
  .then(embedChunksStep) // Embed all chunks for this document
  .then(formatResultStep) // Format the final output
  .commit()

// Use the nested workflow inside foreach
export const batchProcessWorkflow = createWorkflow({
  id: 'batch-process-documents',
  inputSchema: z.array(z.object({ url: z.string() })),
  outputSchema: z.array(
    z.object({
      embeddings: z.array(z.array(z.number())),
      metadata: z.object({ url: z.string(), chunkCount: z.number() }),
    }),
  ),
})
  .foreach(processDocumentWorkflow, { concurrency: 3 })
  .commit()

// Each document goes through all 4 steps before the next document starts (with concurrency: 1)
// With concurrency: 3, up to 3 documents process their full pipelines in parallel
Why use nested workflows:
- Better parallelism: With
concurrency: N, multiple items run their full pipelines simultaneously. Chained.foreach().foreach()processes all items through step 1, waits, then all through step 2 - nested workflows let each item progress independently - All steps for one item complete together before results are collected
- Cleaner than multiple
.foreach()calls which create nested arrays - Each nested workflow execution is independent with its own data flow
- Easier to test and reuse the per-item logic separately
How it works:
- The parent workflow passes each array item to an instance of the nested workflow
- Each nested workflow runs its full step sequence for that item
- With
concurrency > 1, multiple nested workflows execute in parallel - The nested workflow's final output becomes one element in the result array
- After all nested workflows complete, the next step in the parent receives the full array
Choosing the right patternDirect link to Choosing the right pattern
Use this section as a reference for selecting the appropriate control flow method.
Quick referenceDirect link to Quick reference
| Method | Purpose | Input | Output | Concurrency |
|---|---|---|---|---|
.then(step) | Sequential processing | T | U | N/A (one at a time) |
.parallel([a, b]) | Different operations on same input | T | { a: U, b: V } | All run simultaneously |
.foreach(step) | Same operation on each array item | T[] | U[] | Configurable (default: 1) |
.branch([...]) | Conditional path selection | T | { selectedStep: U } | Only one branch runs |
.parallel() vs .foreach()Direct link to parallel-vs-foreach
Use .parallel() when you have one input that needs different processing:
// Same user data processed differently in parallel
workflow.parallel([validateStep, enrichStep, scoreStep]).then(combineResultsStep)
Use .foreach() when you have many inputs that need the same processing:
// Multiple URLs each processed the same way
workflow.foreach(downloadStep, { concurrency: 5 }).then(aggregateStep)
When to use nested workflowsDirect link to When to use nested workflows
Inside .foreach() - when each array item needs multiple sequential steps:
// Each document goes through a full pipeline
const processDocWorkflow = createWorkflow({...})
  .then(downloadStep)
  .then(parseStep)
  .then(embedStep)
  .commit();

workflow.foreach(processDocWorkflow, { concurrency: 3 })
This is cleaner than chaining .foreach().foreach(), which creates nested arrays.
Inside .parallel() - when a parallel branch needs its own multi-step pipeline:
const pipelineA = createWorkflow({...}).then(step1).then(step2).commit();
const pipelineB = createWorkflow({...}).then(step3).then(step4).commit();

workflow.parallel([pipelineA, pipelineB])
Chaining patternsDirect link to Chaining patterns
| Pattern | What happens | Common use case |
|---|---|---|
.then().then() | Sequential steps | Simple pipelines |
.parallel().then() | Run in parallel, then combine | Fan-out/fan-in |
.foreach().then() | Process all items, then aggregate | Map-reduce |
.foreach().foreach() | Creates array of arrays | Avoid - use nested workflow or .map() with .flat() |
.foreach(workflow) | Full pipeline per item | Multi-step processing per array item |
Synchronization: when does the next step run?Direct link to Synchronization: when does the next step run?
Both .parallel() and .foreach() are synchronization points. The next step in the workflow only executes after all parallel branches or all array iterations have completed.
workflow
  .parallel([stepA, stepB, stepC]) // All 3 run simultaneously
  .then(combineStep) // Waits for ALL 3 to finish before running
  .commit()

workflow
  .foreach(processStep, { concurrency: 5 }) // Up to 5 items process at once
  .then(aggregateStep) // Waits for ALL items to finish before running
  .commit()
This means:
.parallel()collects all branch outputs into an object, then passes it to the next step.foreach()collects all iteration outputs into an array, then passes it to the next step- Results can't be "streamed" to the next step as they complete
Concurrency behaviorDirect link to Concurrency behavior
| Method | Behavior |
|---|---|
.then() | Sequential - one step at a time |
.parallel() | All branches run simultaneously (no limit option) |
.foreach() | Controlled via { concurrency: N } - default is 1 (sequential) |
Nested workflow in .foreach() | Respects parent's concurrency setting |
Performance tip: For I/O-bound operations in .foreach(), increase concurrency to process items in parallel:
// Process up to 10 items simultaneously
workflow.foreach(fetchDataStep, { concurrency: 10 })
Loop managementDirect link to Loop management
Loop conditions can be implemented in different ways depending on how you want the loop to end. Common patterns include checking values returned in inputData, setting a maximum number of iterations, or aborting execution when a limit is reached.
Aborting loopsDirect link to Aborting loops
Use iterationCount to limit how many times a loop runs. If the count exceeds your threshold, throw an error to fail the step and stop the workflow.
const step1 = createStep({...});

export const testWorkflow = createWorkflow({...})
  .dountil(step1, async ({ inputData: { userResponse, iterationCount } }) => {
    if (iterationCount >= 10) {
      throw new Error("Maximum iterations reached");
    }
    return userResponse === "yes";
  })
  .commit();