Control Flow
Workflows run a sequence of predefined tasks, and you can control how that flow is executed. Tasks are divided into steps, which can be executed in different ways depending on your requirements. They can run sequentially, in parallel, or follow different paths based on conditions.
Each step connects to the next in the workflow through defined schemas that keep data controlled and consistent.
Core principlesDirect link to Core principles
- The first step’s
inputSchemamust match the workflow’sinputSchema. - The final step’s
outputSchemamust match the workflow’soutputSchema. - Each step’s
outputSchemamust match the next step’sinputSchema.- If it doesn’t, use Input data mapping to transform the data into the required shape.
Chaining steps with .then()Direct link to chaining-steps-with-then
Use .then() to run steps in order, allowing each step to access the result of the step before it.

const step1 = createStep({
  //...
  inputSchema: z.object({
    message: z.string()
  }),
  outputSchema: z.object({
    formatted: z.string()
  })
});

const step2 = createStep({
  // ...
  inputSchema: z.object({
    formatted: z.string()
  }),
  outputSchema: z.object({
    emphasized: z.string()
  })
});

export const testWorkflow = createWorkflow({
  // ...
  inputSchema: z.object({
    message: z.string()
  }),
  outputSchema: z.object({
    emphasized: z.string()
  })
})
  .then(step1)
  .then(step2)
  .commit();
Simultaneous steps with .parallel()Direct link to simultaneous-steps-with-parallel
Use .parallel() to run steps at the same time. Each step's id is used when defining a following step's inputSchema and becomes the key on the inputData object used to access the previous step's values. The outputs of parallel steps can then be referenced or combined by a following step.

const step1 = createStep({
  id: "step-1",
  // ...
});

const step2 = createStep({
  id: "step-2",
  // ...
});

const step3 = createStep({
  id: "step-3",
  inputSchema: z.object({
    "step-1": z.object({
      formatted: z.string()
    }),
    "step-2": z.object({
      emphasized: z.string()
    })
  }),
  outputSchema: z.object({
    combined: z.string()
  }),
  execute: async ({ inputData }) => {
    const { formatted } = inputData["step-1"];
    const { emphasized } = inputData["step-2"];
    return {
      combined: `${formatted} | ${emphasized}`
    };
  }
});

export const testWorkflow = createWorkflow({
  // ...
  inputSchema: z.object({
    message: z.string()
  }),
  outputSchema: z.object({
    combined: z.string()
  })
})
  .parallel([step1, step2])
  .then(step3)
  .commit();
📹 Watch: How to run steps in parallel and optimize your Mastra workflow → YouTube (3 minutes)
Output structureDirect link to Output structure
When steps run in parallel, the output is an object where each key is the step's id and the value is that step's output. This allows you to access each parallel step's result independently.
const step1 = createStep({
  id: "format-step",
  inputSchema: z.object({ message: z.string() }),
  outputSchema: z.object({ formatted: z.string() }),
  execute: async ({ inputData }) => ({
    formatted: inputData.message.toUpperCase()
  })
});

const step2 = createStep({
  id: "count-step",
  inputSchema: z.object({ message: z.string() }),
  outputSchema: z.object({ count: z.number() }),
  execute: async ({ inputData }) => ({
    count: inputData.message.length
  })
});

const step3 = createStep({
  id: "combine-step",
  // The inputSchema must match the structure of parallel outputs
  inputSchema: z.object({
    "format-step": z.object({ formatted: z.string() }),
    "count-step": z.object({ count: z.number() })
  }),
  outputSchema: z.object({ result: z.string() }),
  execute: async ({ inputData }) => {
    // Access each parallel step's output by its id
    const formatted = inputData["format-step"].formatted;
    const count = inputData["count-step"].count;
    return {
      result: `${formatted} (${count} characters)`
    };
  }
});

export const testWorkflow = createWorkflow({
  id: "parallel-output-example",
  inputSchema: z.object({ message: z.string() }),
  outputSchema: z.object({ result: z.string() })
})
  .parallel([step1, step2])
  .then(step3)
  .commit();

// When executed with { message: "hello" }
// The parallel output structure will be:
// {
//   "format-step": { formatted: "HELLO" },
//   "count-step": { count: 5 }
// }
Key points:
- Each parallel step's output is keyed by its
id - All parallel steps execute simultaneously
- The next step receives an object containing all parallel step outputs
- You must define the
inputSchemaof the following step to match this structure
Conditional logic with .branch()Direct link to conditional-logic-with-branch
Use .branch() to choose which step to run based on a condition. All steps in a branch need the same inputSchema and outputSchema because branching requires consistent schemas so workflows can follow different paths.

const step1 = createStep({...})

const stepA = createStep({
  // ...
  inputSchema: z.object({
    value: z.number()
  }),
  outputSchema: z.object({
    result: z.string()
  })
});

const stepB = createStep({
  // ...
  inputSchema: z.object({
    value: z.number()
  }),
  outputSchema: z.object({
    result: z.string()
  })
});

export const testWorkflow = createWorkflow({
  // ...
  inputSchema: z.object({
    value: z.number()
  }),
  outputSchema: z.object({
    result: z.string()
  })
})
  .then(step1)
  .branch([
    [async ({ inputData: { value } }) => value > 10, stepA],
    [async ({ inputData: { value } }) => value <= 10, stepB]
  ])
  .commit();
Output structureDirect link to Output structure
When using conditional branching, only one branch executes based on which condition evaluates to true first. The output structure is similar to .parallel(), where the result is keyed by the executed step's id.
const step1 = createStep({
  id: "initial-step",
  inputSchema: z.object({ value: z.number() }),
  outputSchema: z.object({ value: z.number() }),
  execute: async ({ inputData }) => inputData
});

const highValueStep = createStep({
  id: "high-value-step",
  inputSchema: z.object({ value: z.number() }),
  outputSchema: z.object({ result: z.string() }),
  execute: async ({ inputData }) => ({
    result: `High value: ${inputData.value}`
  })
});

const lowValueStep = createStep({
  id: "low-value-step",
  inputSchema: z.object({ value: z.number() }),
  outputSchema: z.object({ result: z.string() }),
  execute: async ({ inputData }) => ({
    result: `Low value: ${inputData.value}`
  })
});

const finalStep = createStep({
  id: "final-step",
  // The inputSchema must account for either branch's output
  inputSchema: z.object({
    "high-value-step": z.object({ result: z.string() }).optional(),
    "low-value-step": z.object({ result: z.string() }).optional()
  }),
  outputSchema: z.object({ message: z.string() }),
  execute: async ({ inputData }) => {
    // Only one branch will have executed
    const result = inputData["high-value-step"]?.result ||
                   inputData["low-value-step"]?.result;
    return { message: result };
  }
});

export const testWorkflow = createWorkflow({
  id: "branch-output-example",
  inputSchema: z.object({ value: z.number() }),
  outputSchema: z.object({ message: z.string() })
})
  .then(step1)
  .branch([
    [async ({ inputData }) => inputData.value > 10, highValueStep],
    [async ({ inputData }) => inputData.value <= 10, lowValueStep]
  ])
  .then(finalStep)
  .commit();

// When executed with { value: 15 }
// Only the high-value-step executes, output structure:
// {
//   "high-value-step": { result: "High value: 15" }
// }

// When executed with { value: 5 }
// Only the low-value-step executes, output structure:
// {
//   "low-value-step": { result: "Low value: 5" }
// }
Key points:
- Only one branch executes based on condition evaluation order
- The output is keyed by the executed step's
id - Subsequent steps should handle all possible branch outputs
- Use optional fields in the
inputSchemawhen the next step needs to handle multiple possible branches - Conditions are evaluated in the order they're defined
Input data mappingDirect link to Input data mapping
When using .then(), .parallel(), or .branch(), it is sometimes necessary to transform the output of a previous step to match the input of the next. In these cases you can use .map() to access the inputData and transform it to create a suitable data shape for the next step.

const step1 = createStep({...});
const step2 = createStep({...});

export const testWorkflow = createWorkflow({...})
  .then(step1)
  .map(async ({ inputData }) => {
    const { foo } = inputData;
    return {
      bar: `new ${foo}`,
    };
  })
  .then(step2)
  .commit();
The .map() method provides additional helper functions for more complex mapping scenarios.
Available helper functions:
getStepResult(): Access a specific step's full outputgetInitData(): Access the workflow's initial input datamapVariable(): Use declarative object syntax to extract and rename fields
Parallel and Branch outputsDirect link to Parallel and Branch outputs
When working with .parallel() or .branch() outputs, you can use .map() to transform the data structure before passing it to the next step. This is especially useful when you need to flatten or restructure the output.
export const testWorkflow = createWorkflow({...})
  .parallel([step1, step2])
  .map(async ({ inputData }) => {
    // Transform the parallel output structure
    return {
      combined: `${inputData["step1"].value} - ${inputData["step2"].value}`
    };
  })
  .then(nextStep)
  .commit();
You can also use the helper functions provided by .map():
export const testWorkflow = createWorkflow({...})
  .branch([
    [condition1, stepA],
    [condition2, stepB]
  ])
  .map(async ({ inputData, getStepResult }) => {
    // Access specific step results
    const stepAResult = getStepResult("stepA");
    const stepBResult = getStepResult("stepB");

    // Return the result from whichever branch executed
    return stepAResult || stepBResult;
  })
  .then(nextStep)
  .commit();
Looping stepsDirect link to Looping steps
Workflows support different looping methods that let you repeat steps until or while a condition is met, or iterate over arrays. Loops can be combined with other control methods like .then().
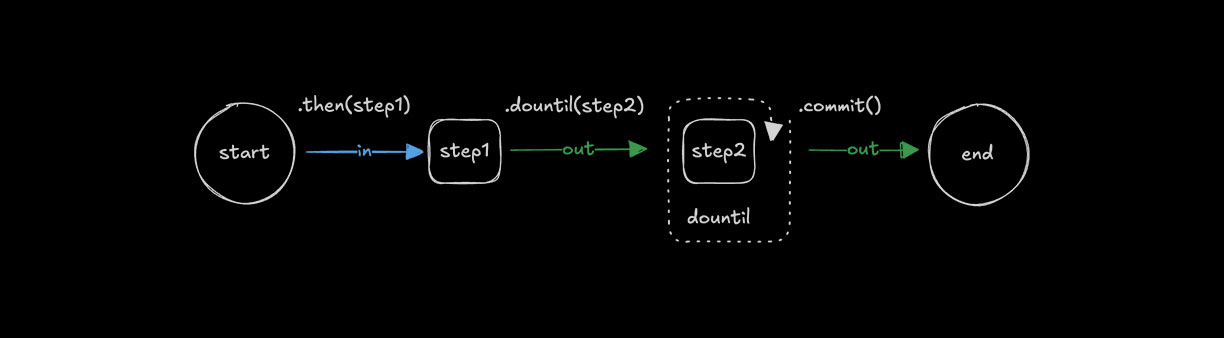
Looping with .dountil()Direct link to looping-with-dountil
Use .dountil() to run a step repeatedly until a condition becomes true.
const step1 = createStep({...});

const step2 = createStep({
  // ...
  execute: async ({ inputData }) => {
    const { number } = inputData;
    return {
      number: number + 1
    };
  }
});

export const testWorkflow = createWorkflow({
  // ...
})
  .then(step1)
  .dountil(step2, async ({ inputData: { number } }) => number > 10)
  .commit();
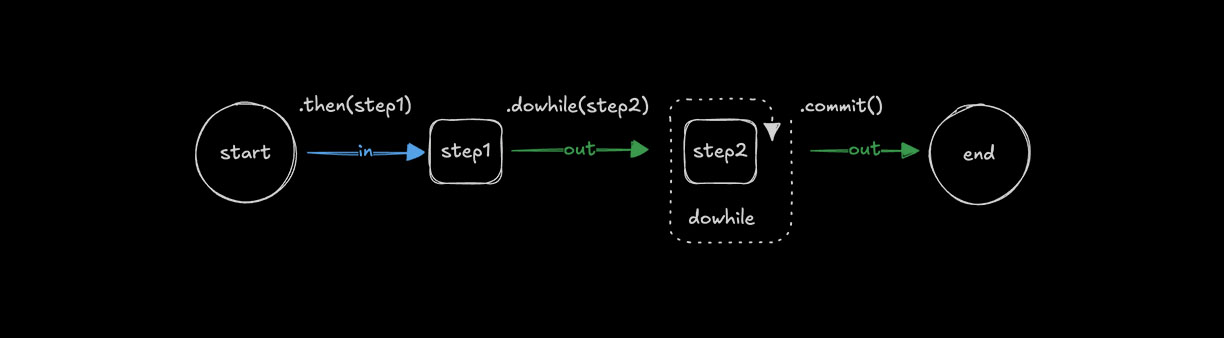
Looping with .dowhile()Direct link to looping-with-dowhile
Use .dowhile() to run a step repeatedly while a condition remains true.
const step1 = createStep({...});

const step2 = createStep({
  // ...
  execute: async ({ inputData }) => {
    const { number } = inputData;
    return {
      number: number + 1
    };
  }
});

export const testWorkflow = createWorkflow({
  // ...
})
  .then(step1)
  .dowhile(step2, async ({ inputData: { number } }) => number < 10)
  .commit();
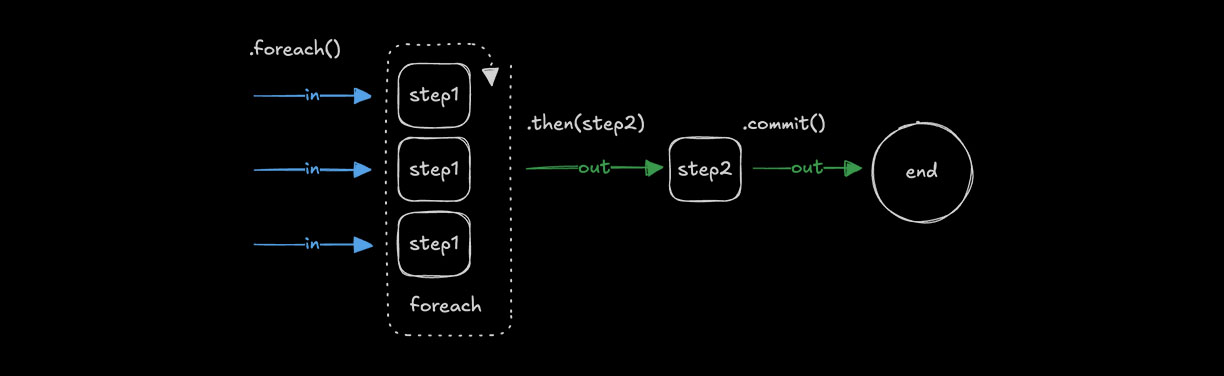
Looping with .foreach()Direct link to looping-with-foreach
Use .foreach() to run the same step for each item in an array. The input must be of type array so the loop can iterate over its values, applying the step’s logic to each one.
const step1 = createStep({
  // ...
  inputSchema: z.string(),
  outputSchema: z.string(),
  execute: async ({ inputData }) => {
    return inputData.toUpperCase();
  }
});

const step2 = createStep({...});

export const testWorkflow = createWorkflow({
  // ...
  inputSchema: z.array(z.string()),
  outputSchema: z.array(z.string())
})
  .foreach(step1)
  .then(step2)
  .commit();
Concurrency limitsDirect link to Concurrency limits
Use concurrency to control the number of array items processed at the same time. The default is 1, which runs steps sequentially. Increasing the value allows .foreach() to process multiple items simultaneously.
const step1 = createStep({...})

export const testWorkflow = createWorkflow({...})
  .foreach(step1, { concurrency: 4 })
  .commit();
Loop managementDirect link to Loop management
Loop conditions can be implemented in different ways depending on how you want the loop to end. Common patterns include checking values returned in inputData, setting a maximum number of iterations, or aborting execution when a limit is reached.
Aborting loopsDirect link to Aborting loops
Use iterationCount to limit how many times a loop runs. If the count exceeds your threshold, throw an error to fail the step and stop the workflow.
const step1 = createStep({...});

export const testWorkflow = createWorkflow({...})
  .dountil(step1, async ({ inputData: { userResponse, iterationCount } }) => {
    if (iterationCount >= 10) {
      throw new Error("Maximum iterations reached");
    }
    return userResponse === "yes";
  })
  .commit();